Sunday, June 27, 2010

iOS4: How to Prevent iAd from Using Your Location and Data


If you don’t want iAd to utilize data tracking cookies and location tracking to serve up relevant ads based on the info, you can opt-out to the service and feel just a less bit spied upon.

1. Go to your iOS4 iPhone or iPod Touch.


2. Open the Safari browser.

3. Go to http://oo.apple.com .

4. You should come to a page that states that you have successfully opted-out.

If you have multiple iOS4 devices, you will need to do the above for each device.


Read Full Entry

Saturday, June 26, 2010

iPhone 4 FaceTime Tutorial: Enable, Disable, and Free Wifi Calls


FaceTime is one of the most interesting features of the new iPhone 4. In this tutorial we will talk through some of the common questions such as enabling and disabling. Surprisingly, FaceTime can be used to make free iPhone to iPhone calls if both devices are on wifi networks.

FaceTime is Apple’s push into video calling. Currently, it is only available between two iPhone 4 devices on wifi. However, Apple is expected to open the protocols to more devices and developers in the future.


First of all, several of my more paranoid friends have asked me how to disable FaceTime on their iPhone 4. I’m introverted enough that I barely talk on the phone. I’m sure some people will never want to video chat.

Here is how to disable/enable FaceTime:

1. Click Settings icon
2. Select Phone
3. Slide the FaceTime slider either ON or OFF.

enable or disable iphone 4 facetime

How to Initiate a FaceTime call from a standard cellular call:

1. Make a standard voice call
2. Hit the FaceTime button during the call.
3. The other party will make the decision to accept of decline the FaceTime call.

How to make a free wifi to wifi FaceTime call:

The free wifi to wifi video calling is very interesting. International customers will be able to save a lot of money this way. By initating the call completely through wifi, you avoid the AT&T cellular network completely.

1. Find and select the person you wish to call in your contact list
2. Scroll to the bottom and press the FaceTime button

iphone facetime 4 contact


Read Full Entry

Friday, June 25, 2010

iPhone/iPod Touch iOS4: How to Delete Gmail Messages Instead of Just Archiving Them


If you use the iOS4 Mail client to manage your Gmail messages, then you have found that instead of being able to delete them, the default settings only allow you to archive them. Here’s how to delete the messages and be done with them.

1. Open Settings.

2. Select Mail, Contacts, Calendars.


3. Under Accounts, select the Gmail account.

4. Go to Archive Messages and set it to OFF.

Now go to the Mail app and try to remove a message. Instead of getting this:

you’ll get this:


Read Full Entry

iPad : How to copy your movie DVDs to the Apple iPad / iTunes format (.m4v)


This recipe will explain how to convert your purchased DVDs to the .m4v format which in turn we will import into iTunes to sync to our iPad. There are several ways to do this, I will show you the process that I use which does use one commercial app for ripping, DVDFab.

We’ll break this guide into 3 sections: ripping dvds to pc, convert ripped dvd to ipad format, importing back into itunes/adding ‘flair’ (ie album art, info, sorting).


Software Required:

  • DVDFab 6/7 (retail, approx $50 USD)
    used to rip DVDs to harddrive and remove protection
  • Handbrake (free)
    used to convert DVD files to .m4v, also will keep chapter markers too
  • iTunes (free)
    used of course to sync our media to our iPad

Ripping DVDs to PC Harddrive

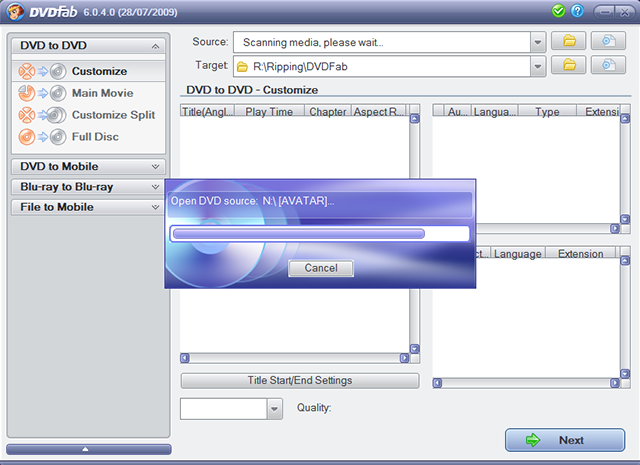
1. Open up DVDFab and insert your DVD. DVDFab will scan the disc and it may take a few minutes to finish scanning.

2. Once it finishes, you will see a list of titles, by default DVDFab should selection the main title, however sometimes you do have to choose it yourself (depending on what tab your on, i use Customize and change my settings to do movie only).

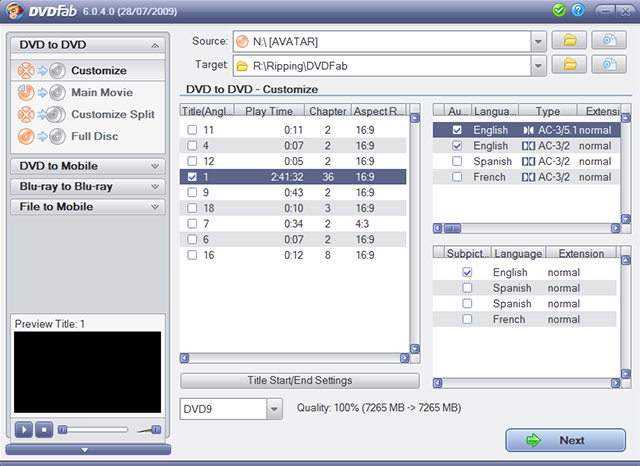
Select your Audio streams and Subtitle/Caption options on the right. You can preview the Title by using the lower left preview window, right-click on the video to choose which audio and subtitle streams to preview also. Once your set, click Next.

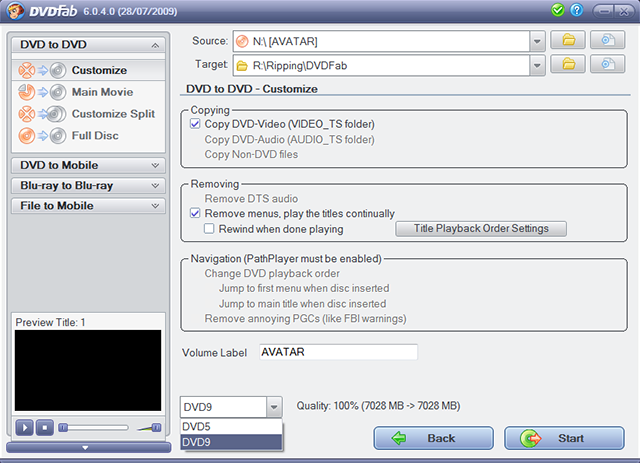
On this screen, Click on the Remove Menus option and also choose if you want to do DVD9 (dual layer), original quality or convert it down DVD5 (single layer) DVD (in the drop-down by the back and start buttons).

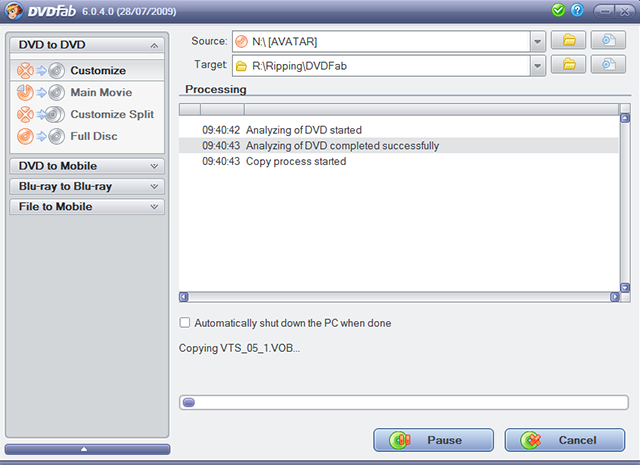
I would recommend DVD9 since its better to start with a higher quality source when converting in handbrake. And then click Start. It will rip the DVD, this usually takes about 10-15 minutes depending on movie and your system, etc.

Converting Ripped DVD to iPad Format (.m4v)

1. Open up Handbrake and then click Source button and choose DVD/Video_TS Folder

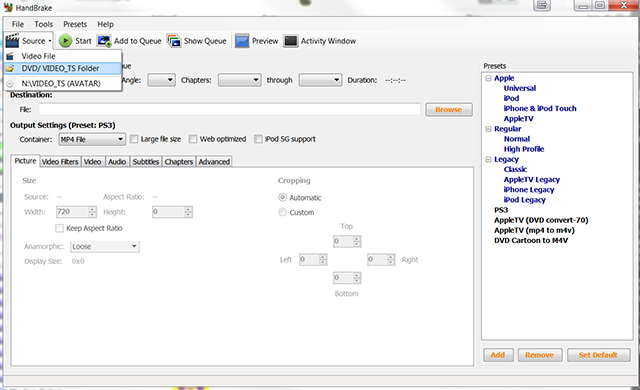
2. Browse to where we saved our ripped DVD to and click on it and OK. (my example, R:\Ripping\DVDFab\ ).

3. Handbrake will scan the folder for a few seconds. Once its done, use the AppleTV preset on the right side. Click on it and it will change the settings in Handbrake to match the AppleTV requirements. AppleTV and the iPad are very similar in terms of what video formats they take.

You can now also change the Quality to your liking. By default it is set around 65%, I personally change it to about 50% to get nice files sizes (about 1gb for 1hour, ie 2 hour movie = 2g).

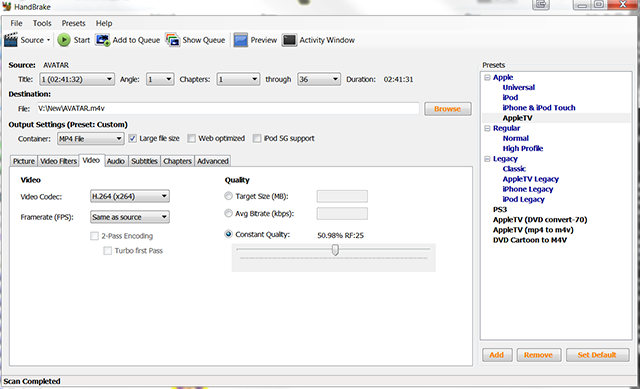
Also, you can add languages and subtitles by click on the tabs and setting the options Once your set, click on Start button to start converting right away or use the Add to Queue to convert later or in batches.

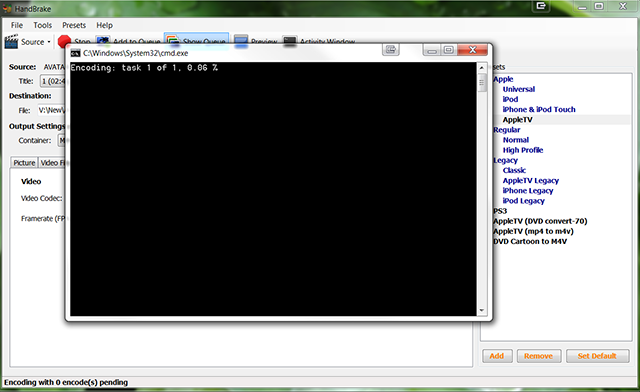
This will take a few hours or so depending on your system. I usually setup a queue of movies to do at night right before I go to bed.

Importing the movies into iTunes / Adding album art and info

1. Open iTunes. In Windows Explorer, browse to where you saved your converted .m4v file to. Click and drag the file into the iTunes window (you will see a + sign next to your mouse when your hovering)

2. iTunes will now copy this files into your iTunes library. Once its done copying, go to Movies and right-click on the movie and choose Get Info.

3. You can now add album artwork via the artwork tab, info about the movie in the Info tab, sorting options, and change options so that it shows in the TV Shows or as a Music Video (via Options tab).

Once your done, just be sure your iPad is set to sync movies and sync away! :)


Read Full Entry

iPhone iOS4: Lock Orientation. (But where is the Horizontal Lock?)


One of my favorite features of my iPad is the ability to lock the orientation in one direction. With iOS4 for the iPhone, locking the orientation vertically in portrait orientation is now available. Should horizontal lock be available too?

I enjoy reading on my iPad and iPhone. One of the problems with reading on the iPhone is that the phone will change orientation with movement. For example, when I lie down on my side to read, the phone often can’t decide what orientation to use. Locking the phone vertically in portrait orientation fixes this problem.


1. Double tap the home key to access the background control screen.

2. Swipe-right until you see iPad and orientation controls

swipe right to get to background controls

3. Click the Portrait Orientation lock button

press portrait lock button

Where is the Horizontal Lock option?

I am one of these people that enjoy reading from my iPhone in horizontal orientation as well. Many web sites, especially forums, are often better viewed in this position. Since horizontal lock is available on the iPad, I will be keeping my fingers crossed that it’s an option for the iPhone in the future as well.


Read Full Entry

Thursday, June 24, 2010

iPhone, iPod Touch: How to Gift an App from the App Store


Have you found a cool application that you want to purchase and send to a friend or family member? iOS 4 makes it easy to do from your device!

1. Go to the App Store and locate the application that you wish to gift to someone.


2. Scroll to the bottom of the screen and tap the Gift This App button.

3. Input your iTunes password.

4. Scroll down and tap the Next button.

5. Input your Name, the Recipient’s name and their email address. You can send to multiple recipients but remember that you will beer charged for each address. Add a personal message and tap the Next button.

6. Select the Buy Gift button for the gift to be sent.


Read Full Entry

iPhone iOS4 Fix: Blurry or Corrupt Photos


Many users are reporting that after upgrading to iOS4 that photos on the device appear corrupted or blurry. The fix is relatively easy and outlined below.

The cause of the blurriness that some people have noticed after upgrading to iOS4 is not clear. It appears to me that the photos may be getting optimized more that once and thus degrading the image quality.


Your original photos are safe and sound on your computer. To fix, just resync your photos to your computer.

1. Connect your iPhone to your computer and load iTunes
2. Select your device in the left sidebar
3. Click the Photos tab
4. Uncheck the Sync Photos check box
5. Press Sync to remove the photos from your iPhone
6. Once your sync is completed, recheck the Sync Photos check box
7. Press Sync to return your photos to your device.


Read Full Entry

Tuesday, June 22, 2010

iPhone iOS4: Creating and Using Folders


With the new iPhone OS, users can finally organize their applications by placing them within folders.

Scrolling through screens and screens of applications is not a very efficient way to keep a phone organized. In iOS4, users can use a series of folders to keep their applications better sorted


Using Folders:

1. Tap and hold your finger over an app until you enter the edit mode. This starts just like the user was going to move an app to a different page. Most of the apps with have black X’s in the upper left-hander corner.
2. Slide one app onto the top of another app that you want to place in a folder together.
3. Name your folder
4. Continue to slide additional apps into that folder.

iphone folders ios4

Here’s an example:

Hold game A until the black Xs appear. Slide game A onto game B until it creates a folder. Name the folder. Drag the rest of your games into that folder.

How Do I Delete a Folder?

Just drag all the apps out of the folder and it will disappear.


Read Full Entry

iPhone iOS4: Change Background without Jailbreak


With the release of the new iPhone OS, users can change the phone’s background image. Jailbreaking the phone is no longer required for changing the background images.

Background images are a fun way to customize your iPhone. With iOS4 it’s easy too.


1. Click Settings
2. Select Wallpaper
3. Select the Wallpaper sample image
4. Navigate and select your specific wallpaper image
5. Click Set
6. Select if you want to set the image to the Lock Screen, Home Screen, or Both.
7. Press Home button to see how it looks!

Read Full Entry

Tuesday, June 15, 2010

iTunes: How to Create an Account Without a Credit Card

If you want to create an account so that you can download free apps for your iPad, iPhone, or iPod Touch from the App Store and you don’t have a credit card, there is a simple way to create an account without having to use payment information.

1. Open the iTunes application on your computer.

2. In the left column, select iTunes Store.


3. Go to the menu at the top of the right column and select App Store.

4. Find a free application that you want to download and click the Free App button that appears beneath the app’s icon on the description page.

5. A box for signing in will appear. Click the Create New Account button.

6. Click the Continue button.

7. Check the I have read and agree to the iTunes Terms and Conditions checkbox and click the Continue button.

8. Fill out the email, password, security question and answer and date of birth information.

9. Click the Continue button.

10. When the Payment Method screen appears, select the None radio button.

11. Fill out the remaining fields for your name and address.

12. Click the Continue button.

13. A verification email will be sent the the email address that you gave above. Click the Done button.

14. Go to the verification email and click the included link to confirm the account.

You can now use the account you created to download free apps for your device.


Read Full Entry

Friday, June 11, 2010

How to Prevent Automated Sync on iPhone, iPad, or iPod Touch


On many systems a connected iPhone, iPad, or iPod will try to sync with iTunes as soon as it is connected via USB to a computer system. This tutorial will show to how permanently or temporarily stop the automatic sync behavior.

With all of my music, podcasts, and applications, I really do not want to automatically sync every single time I plug my device into my computer. Here’s a couple of options to prevent this:


This will disable automatic sync until you re-enable it:

1. Under the iTunes Preferences, select the Devices tab
2. Check Prevent iPods, iPhones, and iPads from syncing automatically box

disable sync iphone ipad ipod touch

3. Click OK

If you want to disable sync for just one connection:

1. As you plug in your device, press command+option key in OSX.
(Or for a windows machine, press Shift+Control)
2. The device will mount without syncing.


Read Full Entry

Safari 5: How to Hack and Customize the Reader


Safari 5 now contains a “reader” mode that converts busy web pages into boring black text on a white background. If you are a heavy user of this mode, you might want to hack this display into something more unique to you.

So you like Safari’s new reader mode, but you want to tweak it a bit? It’s really easy to change.


Disclaimer: You can really break safari if you don’t know what you are doing. If you do bork the application, you should be able to delete it and reinstall.

Here’s how to customize the reader in OS X:

1. Find your Safari.app in your Applications.
2. Right-click (control-click) on it and select Show Package Contents
3. Open Reader.html in your favorite html/css editing application.
4. Consider making a backup of the file before editing in case you break things.
5. Edit the css and html to your hearts content. You may need to input your password to save.
6. To test you’ll have to open new web pages in the reader each time.

Here are some nonsensical changes for your pleasure…

Before:

safari reader before hack

After:

safari reader before hack

Obviously my changes are silly, but there are legitimate uses for this. For example…
– Changing the window size for bigger/smaller screens
– Changing colors for better reading in certain light situations
– Changing font styles


Read Full Entry

Thursday, June 10, 2010

Am I Eligible for an iPhone Upgrade?


With new iPhones coming out all the time, many iPhone users need to check their eligibility for a free iPhone upgrade. It is super easy to check, and here is how to do it.

AT&T frequently will shorten the time users have to wait to receive a free or discounted iPhone upgrade. With the new iPhones coming out soon, several people have asked me how to see if they are eligible. You could log into your AT&T account to check, but that’s painful.


Here is the easy way.

From your iphone’s keypad, “call” the following: *639#

iphone eligible

Within a few seconds, you will receive a text message from AT&T telling you of your potential to upgrade your phone.

iphone upgrade


Read Full Entry

iBooks: Build Your Library by Using Google to Find Free eBooks


iBooks is a great ebook reader for the iPad. By using Google, you can easily build your collection of ebooks by finding the books that are just waiting to be downloaded.

iBooks uses files that are of the epub filetype. By searching for and downloading epub files, you will not have to perform any conversion on the file. You can simply drag and drop the file into iTunes and sync it to your iPad.


To search for ebooks in the epub format, go to Google and use the following query in the search box:

-inurl:htm -inurl:html intitle:”index of” +(”/ebooks”|”/book”) +(epub)

or -inurl:htm -inurl:html intitle:”index of” epub

You can add the title or author of the desired book to the query, so that it looks like this:

-inurl:htm -inurl:html intitle:”index of” +(”/ebooks”|”/book”) +(epub) Twilight

If you cannot find the desired book in the epub format, don’t give up yet. You can search for the book in other formats such as PDF, LIT, PRC, etc. and use the free ebook management application called Calibre to convert the file to the epub format. Just modify your query to search for the additional filetypes:

-inurl:htm -inurl:html intitle:”index of” +(”/ebooks”|”/book”) +(epub|pdf|lit|prc|zip) Twilight


Read Full Entry

iPad: Use Keyboard Shortcuts with Bluetooth Keyboard


If you are using a Bluetooth keyboard on your iPad device, you should take advantage of the keyboard shortcuts for quicker access to copy, cut, paste, undo, redo, and other commands.

Command + C : Copy Selected Text
Command + V : Paste
Command + X: Cut Selected Text


Command + Z: Undo
Command + Shift + Z: Redo

Command + Delete: Delete everything to the left of the cursor on the current line
Option + Delete: Delete the word to the left of the cursor

Command + Up Arrow: Go to top of document
Command + Down Arrow: Go to bottom of document
Command + Left Arrow: Go to beginning of current line
Command + Right Arrow: Go to end of current line

F1: Dim screen
F2: Brighten screen
F7: Back one song
F8: Play/pause song
F9: Skip song
F10: Mute
F11: Decrease volume
F12: Increase volume

Eject button: Show or hide onscreen keyboard

Read Full Entry

Android 2.2 (Froyo): How to View Desktop or iPhone Versions of Websites with the Web Browser


If you are tired of viewing the simple mobile version of websites and yearn for the iPhone or desktop version, you’re in luck. By simply changing the user agent string for the web browser, you can view the sites the way that you like them.

1. Open the Browser app.

2. Input about:debug into the address bar and enter.


3. Select the Menu key.

4. Select More.

5. Select Settings (you will have an extended list of settings).

6. Scroll down to the bottom of the list.

7. Select UAString.

8. Select the desired string from the menu, options are Android, Desktop, and iPhone.


Read Full Entry

Nexus One: Use the Power Button to End Calls


If you hate using the touch screen to end calls, Froyo (Android 2.2) allows you to use the Power Button (the button on the top of the phone for powering on/off the phone and locking the screen) to end a call. It’s nice to have a physical button to hang up when you’re done.

1. Go to the Home screen.


2. Select the Menu key.

3. Select Settings.

4. Select Accessibility.

5. Check the Power button ends call checkbox.


Read Full Entry

Android 2.2 (Froyo): Use Pattern, PIN or Password for Screen Unlock Security


Froyo (Android 2.2) keeps the unlock pattern that we’re all familiar with for securing the unlock screen, but adds PIN and Password options as well. That means you don’t have to rely on remembering some pattern to unlock your screen.

1. Go to the Home screen.


2. Select the Menu key.

3. Select Settings.

4. Select Location & security.

5. Select Set up screen lock.

6. Choose the desired method for screen unlock security, choices are None, Pattern, PIN, or Password.

Depending on the selected option, you will need to assign the desired pattern, PIN, or Password.


Read Full Entry

Android 2.2: Make Your Device a Portable Wi-Fi Hotspot


You can use your Android phone as a portable hotspot and get your iPad, iPod Touch, Zune HD, or any other wireless device online. This is a great save when there are no available wireless connections available.

1. Go to the Home screen.


2. Select the Menu key.

3. Select Settings.

4. Select Wireless & networks.

5. Select Tethering & portable hotspot.

6. Check the Portable Wi-Fi hotspot checkbox.

7. Select Portable Wi-Fi hotspot settings.

8. Select Configure Wi-Fi hotspot.

9. Input a Network SSID for your connection.

10. Select a security protocol. Options are Open and WPA2 PSK.

If you select WPA2 PSK, input a password for the connection and then select the Save button.

Your portable hotspot is now created.

You will use the Portable Wi-Fi hotspot checkbox from above to enable and disable the connection. Once the connection is active, go to the device you wish to connect and configure its wireless connection to the Network SSID for you Android device and input the password (if you are using WPA2 PSK). You now have wireless access for your iPad, iPhone Touch, Zune HD, etc. anytime there is a cellular connection for your Android phone.


Read Full Entry